News

Titan Carapace

Saturday 30 June 2012

I've not gone away again, still working on the titan. Things slowed a little when I took time to relearn an old lesson. That being fully extended box cutter + slicing towards own hand through foam = blood everywhere. Fortunately it was a fairly new knife, so made a clean, if deep, cut and it's healed pretty well.

Anyway I've been working on the carapace. I think this is the trickiest part, so many curves on that thing and it defines the style quite distinctively.

That's the original. So it curves in pretty much every direction, left to right and front to back on the top panel, then the four sides also curve in two dimensions. Makes it tricky.

So I jumped in with a big block of foam:
I made up some figures from looking at pictures, then tried to turn a 3d object into a 2d plan I could draw on a sheet of foam. Tricky, but the shape was about right. Then I started slicing along the top from each end to try and put the curve in.

That's when the mishap struck, so as a work around I have to chop the whole thing in half. Meant I could cut the full width with one slice and made it a lot easier to work.
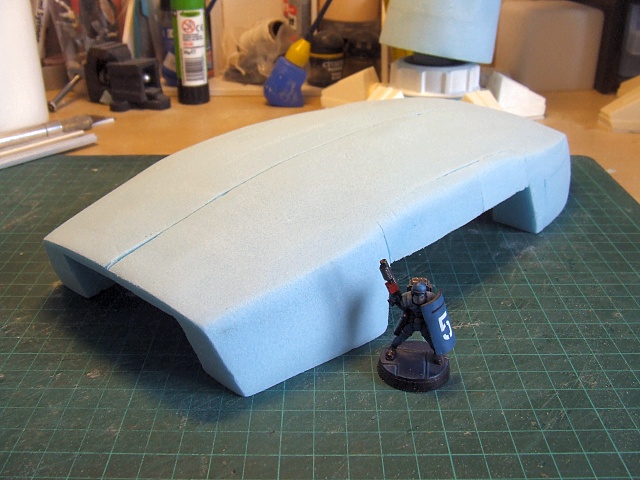
Attached small pieces under each side to try and create the edges. I need to do it once more to give about another 15mm to each side.

Here's where we are now:
 Plenty of smoothing to do, then I'll fill using modelling putty. Still not sure how I'm going to get the finish on this, not sure I want to try and plate it with plasticard. We'll see, I've managed a pretty smooth finish over filler on my scale model cars so might be worth a go.

News

Titan Standing!

Sunday 24 June 2012

Woo, he stands up under his own power now.


I need to put a pin through each thigh, at the moment the legs rotate meaning he leans forward and backwards too easily. Might have a go at the head next..
News

Titan Progress

Reaver is coming along nicely. Got the other toes cast up:
Really happy with the new resin, seems to be a lot easier to work with. Literally no bubbles at all in these casts.
I've just now shaped the other greave, it needs a top part creating and I need to do the wrapper for the foot, but it's almost ready for assembly.

The body is getting there also. Figured out how to do the hips and the shoulders. Hips are just two pipe joints mounted on a piece of 22mm pipe through the middle. Pretty tight fit and should keep everything upright. If not I can pin through the side if need be.
Thighs will probably be that thin, but then I'll add other supporting struts around the side. The original reaver had really narrow thighs too as shown. Want a quick mockup? Go on then
 Cool huh? Need to figure out the knees.

Oh and the shoulders will be the following, mounted inside a 22mm pipe, then the washer and nut go above the shoulder joint. Should allow for hot swappable weapons as well as a sturdy joint. Hurray.

News

Titan Feets! er. foot anyway

Wednesday 20 June 2012

The first foot is constructed, barring the small matter of details. But I've got the basic structure sorted and know how I'm going to join the ankle too.


The bolt will fasten through the black cup piece and into the bottom of the greaves (they grey pieces in the second photo). It'll all make sense and hopefully be sturdy enough to support the entire beast.


Also started the greave (feel guilty now, done more since I took this pic a few hours ago but can't be bothered shooting another. it now has a top piece glued on and looks quite cool if I do say so myself). Not sure if greave is the singular of greaves. Grief is perhaps more accurate ;)

Anyway, here's how it looks with a couple of guys for scale.


As you can see it's going to be rather large. Still not sure how the greaves will be covered. I'm reluctant to try plasticard, even thin stuff, as it'll be a pain to mark and cut. Possibly edge it with than then cover the rest with filler and sand smooth maybe. We'll see.

Next trick is the knee and hip joints. I've just started the pelvic area and think I know how the hip will work. The knee is proving trickier...
News

Titan Toes!

Monday 18 June 2012

Awesome. Just removed my master from the mould, then cast up my first toe. I'm really happy with the result, very little cleanup needed.


Second one is in the cast now. Of course I'm nearly out of resin, typical. Will get some more ordered asap.

Also did a little work on the shin, here's where it is before shaping

 That's it just balanced in the foot so the blue circles could glue together. Going to try and shape it in a minute.

And finally in case you're curious, here's my current work station. I'm actually sat facing the other way at the moment writing on my computer, the cupboard in the distance is full of modelling stuff, there's another bigger one out of shot to the left, and a big glass display case next to that. Proper geek kingdom this :)


News

Titan Body

Sunday 17 June 2012

Next I started planning the body. I scoured around for something the right size, but a raid of the bitz boxes and kitchen cupboards turned up nothing. So blue foam it is (I love this stuff, never used it on a project before but it's so sturdy and workable).


To give the arms a little more support I added two layers of foamed pvc, one above and one below the shoulders. The composite effect should be rock solid.


Then I realised I'd forgotten to add a mount for the head. Oops. Chop one in and we're good to go.


 Next step is planning how the arms will join the shoulders. Then I can cut the appropriate holes in the shoulders and glue the whole torso together. I also want to get started on shaping the head, which will be blue foam, plasticard and probably lots of modelling putty over the top.
News

Titan Toes!

 The toes were always going to be an issue. I hate building things repeatedly and it's one of the points that has put me off building a reaver before. So I decided to make a master and cast it in resin. I've done casting before, but not for a long time, so I needed new supplies and a refresher google.

The toe is built from plasticard, foamed pvc, some cool ribbed conduit (again from B&Q) for detail and lots of modellers putty to smooth.


Then I realised all my lego had run away. Damnit. Had to improvise a moulding box out of foamcard and plasticine. Hopefully it'll stand up to the job.


The mould is now poured and busy curing.
News

Back. Er. Again.

Ok so I admit it, the post last november was something of a false start. What can I say? The Mojoman giveth, the Mojoman he taketh away. But I'm back baby, yeah, and this time I've got my mojo in full swing!

I finished Fall Out New Vegas, and whilst I wait for the Skyrim DLC to come out, I've got nothing rpg going on. So I decided I needed a big modelling project to keep me occupied this summer.

After lots of rambling around the internet I decided on a titan. Aim big right? I thought about doing an old school Warlord, with the rounded carpace, but I wasn't sure I could pull off the smooth curves. I actively dislike the newer warlords, so they were out too. Then I had the inspiration to try an old Armorcast style Reaver. I've always preferred the Armorcast stuff to the forgeworld designs. Whilst FW is far far superior in almost every way, it was the Armorcast stuff that really blew my mind when I first say it however many years ago. Back when it was still available and ten times the size of anything GW was producing themselves.

Here's the fella in case you've not seen him (acquired from t'internet):


The actual Armorcast reaver looks a little dimunitive  compared to the new FW one. But since I'm scratchbuilding I can put that right. I'm aiming for 400mm (16" give or take) to the top of the carpace, then the weapon will sit above that.

I found a great diagram on the internet that I've doodled all over to plan my sizes:


I then spent several days thinking how I was going to build things. Several trips to B&Q helped, and I planned the basics for the feet structure, the bit I thought would take the most work. A combination of the fasterners from a pipe coupling, a couple of small end caps and a couple of rounded knuckle things (I'm no plumber :D) should all work. I'll use milliput in the endcaps to give a smooth hemispherical surface for the knuckles to sit in. A bit of blue foam to tie it all together and tada.